


Heating Your Loft Conversion with Infrared Heating
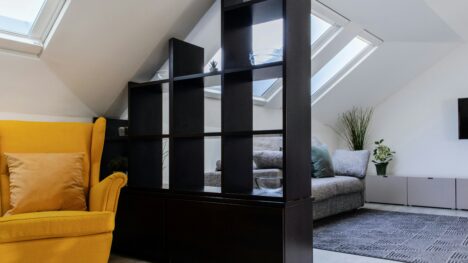
A loft conversion is one of the smartest ways to add space to your home. It’s also one of the hardest rooms to heat properly.
Unlike every other room in the house, the loft wasn’t originally designed as living space. There are no radiators up there, no pipework, and no easy connection to your existing central heating. The ceiling slopes, the walls are short, and the room sits right beneath the roof, exposed to the elements more than any other part of the house.
Most people face the same dilemma: spend thousands extending their central heating system or rely on plug-in heaters and hope for the best. Infrared heating offers a third option, and for loft conversions specifically, it solves problems that other heating options either ignore or create.
This guide covers everything you need to know:
- Why loft conversions are uniquely difficult to heat.
- Why infrared is so well suited to them.
- How it compares to the alternatives.
- How to set it up.
Why Loft Conversions Are Hard to Heat
Before talking about solutions, it’s worth understanding why loft conversions cause so many heating headaches in the first place.
No Existing Heating Infrastructure
The most obvious issue is that there’s no existing heating infrastructure. Every other bedroom, bathroom and living room in your home was built with heating in mind.
The loft wasn’t.
There aren’t any radiators, no pipework running through the floor, and no convenient connection to the boiler. Getting heat up there means either extending your plumbing or finding an independent solution.
Awkward Geometry
Loft conversions have sloped ceilings, low knee walls, dormer windows, and awkward angles. The amount of usable, full-height wall space is often surprisingly limited, and that’s exactly where a traditional radiator needs to go.
In many loft conversions, the only full-height walls are the gable ends, and those are often taken up by windows or furniture.
Higher Heat Loss
Heat loss is another factor. The loft is the most exposed room in the house, with the roof directly above and often external walls on multiple sides.
Even with good insulation (which Building Regulations require for any conversion) the loft will always lose heat faster than a room sandwiched between other rooms on the middle floor. Any heating system that works by warming the air is fighting an uphill battle, because warm air rises and escapes more easily in a room that’s already at the top of the house.
Limited Space
Every square metre in a loft conversion was hard won. The room is typically smaller than the rooms below it, and every bit of floor and wall space matters. Bulky radiators eat into that space.
Underfloor heating systems add build-up height to the floor, which eats into already-limited headroom. In a room where you might already be ducking under the eaves, losing even a few centimetres matters.
Temperature Extremes
And finally, loft conversions are prone to temperature extremes. They’re often too hot in summer and too cold in winter. It’s the room in the house most affected by what’s happening outside.
A good heating solution needs to handle the cold months without making the room unbearable during the warm ones.
Why Infrared Works So Well in a Loft Conversion
Infrared heating addresses every one of those challenges, and in some cases turns them into advantages.
No Plumbing Needed
Infrared panels are fully electric, so the biggest headache disappears immediately. There’s no need to touch your existing central heating system at all. The installation is purely electrical, which makes it simpler, less disruptive, and significantly cheaper.
The Sloped Ceiling Becomes an Advantage
Rather than struggling to find wall space for a radiator, you mount the panel on the one surface you have plenty of, the ceiling. Flush against a slope or flat section, it radiates heat downward across the entire room, reaching the floor, furniture and people directly.
Less Heat Lost Through the Roof
Conventional heating warms the air, which then rises and escapes, exactly the wrong approach in a room directly beneath the roof.
It heats surfaces, objects and people directly, the same way the sun warms you on a cold day. The heat is stored in the walls, floor and furniture rather than floating in the air, so far less of it escapes upward. The room feels warm even at a slightly lower air temperature than you’d need with a convection system.
Independent Zonal Control
The loft gets its own panel, its own thermostat, and its own schedule, completely independent from the rest of the house.
Only use the loft in the evenings? Only heat it in the evenings. Spare bedroom that’s empty most of the week? It stays off until you need it.
No more turning on the whole-house system just to warm one room at the top.
Thin, Lightweight, and Unobtrusive
Infrared panels are slim enough to sit almost flush with a ceiling or wall, light enough for plasterboard surfaces (with the correct fixings), and clean enough visually to blend into any interior.
In a loft conversion where the aesthetic matters, they look like part of the room.
How it Compares to the Alternatives
If you’re researching heating options for a loft conversion, you’ve probably come across several alternatives. Here’s how they stack up, honestly.
Extending Your Central Heating
This is the option most people consider first because it’s what the rest of the house uses.
It can work well and running costs are typically lower than electric heating. But the installation is significantly more involved.
- Pipework needs to be run from your existing system up through the house and into the loft.
- Your boiler needs to have enough spare capacity to handle the additional radiators, and if it doesn’t, you’re looking at a boiler upgrade on top of the plumbing costs.
- The radiators themselves need wall space, which is limited in most loft conversions.
- And once installed, the loft heating is tied to the whole-house system, making independent control more difficult. For a detailed comparison, see our guide on infrared vs gas central heating.
Electric Radiators
Easier to install than wet radiators because they don’t need any pipework. They plug in or wire into the mains, and many now offer smart controls and programmable timers.
However, they still rely on convection, heating the air and circulating it around the room. This means the same heat loss issues apply in a loft. They also need wall space, and in a room with low knee walls and sloped ceilings, finding the right spot can be a challenge.
Underfloor Heating
An excellent heating method, but it comes with practical complications in a loft conversion.
You need to plan it early in the build process because it affects the floor build-up height (the total thickness of the floor structure).
In a room where ceiling height is already limited by the roof slope, adding even 15–20mm to the floor can make a meaningful difference to headroom. Wet underfloor systems also require pipework and a manifold connection. Electric underfloor mats are thinner and easier to retrofit, but they’re more expensive to run.
If you’re weighing this option, our infrared vs underfloor heating comparison covers the details.
Portable and Plug-In Heaters
The cheapest option upfront, but rarely a good long-term solution.
- Fan heaters blow dry, dusty air and are noisy.
- Oil-filled radiators take up floor space, are slow to heat, and can be a trip hazard — particularly on a loft staircase.
Both are expensive to run compared to a properly sized, thermostat-controlled system. Most loft conversion specialists advise against relying on portable heaters as a primary heat source, and for good reason.
How to Set Up Infrared Heating in Your Loft Conversion
Getting infrared right in a loft conversion is straightforward, but it’s worth thinking through each step to make sure you get the best result.
Step 1: Measure the Space and Size the Panels
Start by measuring your loft conversion’s floor area — length times width in metres. If the room has an unusual shape, break it into sections and add them together. Then consider the factors that affect how much heat the room will need:
- How well insulated the roof and walls are.
- How many external surfaces the room has.
- The size and number of windows or skylights.
- The room’s main use.
Getting the sizing right is important. An undersized panel will run constantly without reaching a comfortable temperature. An oversized one will cycle on and off too quickly, which isn’t energy efficient and can make the room feel inconsistent.
Our free online calculator will help you pick the right size.
Step 2: Decide on Mounting Position
For most loft conversions, ceiling mounting is the strongest option. The panel sits flat against the ceiling, whether that’s a flat central section or a sloped surface, and radiates heat downward across the room. This position offers the most even heat distribution, keeps the panel completely out of the way, and avoids using any of the limited wall space.
If ceiling mounting isn’t practical for your setup, perhaps you have a vaulted ceiling that’s too high, or the structure won’t support fixings easily, wall mounting works well too. The gable end wall is usually the best position, mounted high up so the panel has a clear line of sight across the room.
For detailed guidance on both options, see our guides on positioning infrared panels and installing ceiling panels.
Step 3: Plan the Electrical Supply
If your loft conversion is still in the planning or build stage, this is the easiest step. Ask your electrician to include a dedicated circuit or spur for the infrared panels as part of the first-fix electrics. The panels can then be hardwired in neatly with no visible cables, just like a ceiling light.
If your loft conversion is already finished, you still have options. Plug-in panels just need a standard 13-amp socket. Mount the panel, plug it in, and you’re done.
Hardwired panels need a qualified electrician, but the job is straightforward and typically takes under an hour per panel.
Step 4: Add a Controller
A panel on its own will keep the room warm, but pairing it with a controller is what makes the system intelligent.
A thermostat lets you set a target temperature, and the panel takes care of the rest, switching on when the room drops below your target and off when it’s reached.
A programmable timer adds another layer of efficiency. Set the loft to warm up 30 minutes before you head up to bed and switch off after you leave for work in the morning. If the loft is a spare bedroom, keep it off all week and schedule it to come on Friday evening before guests arrive.
Smart and Wi-Fi controllers let you manage the temperature from your phone. Sitting downstairs on the sofa and want the loft office warm before you head up? One tap. This kind of flexibility is one of the real strengths of infrared in a loft.
For a full breakdown of the options, see our guide to infrared heating controllers.
Step 5: Choose the Right Panel Style
Infrared panels don’t need to look like heaters, and in a loft conversion where the room’s look and feel matters, that’s a genuine advantage.
White panels are the most popular choice as they blend cleanly into a white ceiling or wall and are barely noticeable once installed. For most loft conversions, this is the simplest and most effective option.
If the loft is a bedroom, home office or creative space, picture panels let you turn the heater into a piece of wall art. The custom print service takes this further with a favourite photograph, a landscape, or a graphic design printed onto the panel surface.
If your loft conversion includes an en-suite bathroom, mirror panels serve a dual purpose, a heated mirror that also warms the room, saves wall space, and prevents the glass from steaming up after a shower.
Planning Stage vs Retrofit
Whether you’re about to start a loft conversion or already have one, infrared works in both situations, but the approach differs slightly.
If your loft conversion is still being planned or built, you’re in the ideal position. You can specify infrared heating from the start, include it in the electrical first fix, and position panels exactly where they’ll perform best. The electrician is already on site, the ceilings are accessible, and there’s no need to work around finished plasterwork or decoration. It’s also the cheapest time to install because the labour is folded into the overall build cost rather than being a separate job.
If your loft conversion already exists, the good news is that infrared is one of the easiest heating solutions to retrofit. A panel can be mounted on a finished ceiling or wall, connected to a socket or hardwired by an electrician.
If you have a loft conversion that’s too cold in winter, whether because the heating was an afterthought, the plug-in heater isn’t cutting it, or the central heating radiator up there never really worked properly, infrared is a straightforward upgrade that doesn’t require revisiting any of the original build work.
Ready to Heat Your Loft Conversion?
Browse our ceiling panel range to see panels designed for exactly this kind of installation.
Use our free calculator to find the right wattage for your loft conversion.
Or get in touch with our team we can help you choose the right setup for loft conversions every day.

Written by Charli
The Right Heater For You
Find the best heater for you with our infrared heating calculators.
Find now